
Pay Bills
You only need to do this once per vendor. After that, you can make your payments quickly and easily.
-
Log in to digital banking
-
From the menu, click Bill Payments and select Manage Payees
-
Click the + symbol if you’re using our app, or the Add Payee button if you’re on Coast Online® Banking
-
Search for the vendor name and enter your account number
-
Confirm your selection
-
Log in to digital banking
-
From the menu, click Bill Payments and select Pay Bills
-
Choose the account you’d like to pay from
-
Select the bill vendor and enter the payment amount
-
Click Continue and confirm your payment

If you pay the same amount to the same vendor on the same date each month, consider setting up a recurring bill payment and let us do the rest.
-
Log in to digital banking
-
From the menu, click Bill Payments and select Pay Bills
-
Click the Schedule Recurring Payments tab and set the vendor, amount and frequency of the payment
You can schedule bill payments up to one year in advance.
-
Log in to digital banking
-
From the menu, click Bill Payments and select Pay Bills
-
Specify the vendor and amount you with to pay
-
Change the payment date and click Confirm
You can review and edit your scheduled payments by clicking on View Scheduled Payments from the menu.
If your transaction hasn’t been processed yet and you made an error, you can cancel your bill payment from within digital banking.
-
Log in to digital banking
-
From the menu, click Bill Payments and then View Scheduled Payments
-
Find the payment you wish to cancel and click on the trash icon next to it
-
Confirm the cancellation
If your payment does not appear on the “View Scheduled Payments” screen, your payment may have been processed already. Please contact us and be aware a cancellation service fee may apply.
-
An Interac e-Transfer® is a quick and secure way to transfer funds to and from your Coast Capital membership.
-
All you need is the recipient’s mobile phone number or email address.
-
There is no service fee to receive an e-Transfer. Depending on your account type, it’s $1.50 to send an e-Transfer, including sending an e-Transfer request.
If a recipient has not yet accepted the e-Transfer, you can cancel it.
-
Log in to digital banking
-
From the menu, select Interac e-Transfers then Pending e-Transfers
-
Select the trash icon beside the e-Transfer you wish to cancel
-
Confirm you want to cancel the e-Transfer
There is no fee to receive an e-Transfer. Depending on your account type, it’s $1.50 to send an e-Transfer, including sending an e-Transfer request.
It can take up to 30 minutes for the recipient to receive a notification.
You can resend the notification.
-
Log in to digital banking
-
From the menu, select Interac e-Transfers then Pending e-Transfers
-
Select the rounded arrow icon beside the e-Transfer to re-notify the recipient
-
Cancel the e-Transfer
-
Update the recipient’s details. Access this by selecting on Interac e-Transfers from the menu, then Manage Recipients
-
Select the pencil icon and edit the recipient’s information
-
Select Continue, review the recipient's details and select Confirm
-
Enter the security code and select Confirm
-
Resend the e-Transfer
You can view the last 24 months of your sent e-Transfer history in digital banking.
-
Log in to digital banking
-
From the menu, select Interac e-Transfers then e-Transfer History
-
Select the Search filters button and select a date range and/or a status, then select Search
-
You can search for up to 365 days per search
-
-
On the results page, you can select the details icon to view more information about the e-Transfer
Some received e-Transfers will have additional details if the sending financial institution supports this feature. These details could include additional payee/payor information, or additional invoice or document notes. At this time, it is not possible to include these details in e-Transfers sent from Coast Capital.
If the sending financial institution supports the sending of e-Transfers in real-time and you have the Autodeposit feature enabled, you will receive your deposit immediately. The Autodeposit feature allows you to receive e-Transfers without needing to provide a security answer.
If the sending financial institution supports account-to-account e-Transfers, the sender may also send a real-time e-Transfer using your account, institution, and transit number. Contact the person sending the e-Transfer to confirm if their institution supports this feature.At this time, it is not possible to send an e-Transfer from Coast Capital using an account number. However, we do support Autodeposit. If the recipient has Autodeposit enabled, they should receive your e-Transfer in close to real-time.
- Log in to digital banking
- From the menu, select Interac e-Transfers then Autodeposit
- Select the trash icon beside the email address or mobile phone number you wish to delete (on our app, the trash icon appears once you select the ellipsis “
 ” beside the email address or mobile phone number)
 - Confirm you want to delete the email address or mobile phone number
- Enter the security code and select Confirm
Please note, to fully unregister from Autodeposit, all registered email addresses and mobile phone numbers must be deleted.
Deposit On-the-go
-
Log in to digital banking through our mobile app
-
From the menu, tap Deposit On-the-go
-
Specify which account you’d like to deposit your cheque in to and enter the amount of the cheque
-
Tap Take Photo and follow the instructions on the screen
-
Tap Confirm to deposit the cheque
Things you should know
Sign the back of your cheque before you photograph it
Keep the cheque for 90 days, then destroy it within the next 30 days
Holds may apply when you deposit cheques through Deposit On-the-go or an ATM. If you’re unsure what your hold policy is, contact us.
You may be subject to mobile charges. Please consult your phone provider for more details.
-
Log in to digital banking
-
From the menu, select Products & Services then Open an Account
-
Under Day-to-Day Banking, select See accounts
-
Select Open account for the account you want to open
-
Fill in the fields and select Continue
-
Review the details and select Confirm
Opening a USD account? If it's your first account at Coast Capital, open a membership first, then follow the steps above.
- Log into digital banking
- From the menu, select Products & Services then Open an Account
- Under Save or Invest in Your FHSA, select See accounts
- Select the Open account button
- Answer the home ownership question to declare your eligibility
- Verify your contact information is correct, select your beneficiary type and fill in the rest of the fields
- Select Continue
- Review your details and select Confirm
-
Log in to digital banking
-
From the menu, select Products & Services then Open an Account
-
Under Save or Invest in Your TFSA, select See accounts
-
Select the Open account button
-
Verify your contact information is correct, select your beneficiary type and fill in the rest of the fields
-
Select Continue
-
Review your details and select Confirm
First account at Coast Capital? Open a membership first, then follow the steps above.
-
Log in to digital banking
-
From the menu, select Products & Services then Open an Account
-
Under Save or Invest in Your RRSP, select See accounts
-
Select the Open account button
-
Verify your contact information is correct, select your beneficiary type and fill in the rest of the fields
-
Select Continue
-
Review your details and select Confirm
First account at Coast Capital? Open a membership first, then follow the steps above.
-
Log in to digital banking
-
From the menu, select Products & Services then Open an Account
-
Under Earn Guaranteed Interest, select See accounts
-
Select Open account for the GIC type you want to open
-
Select the account you wish to fund the GIC from, fill in the rest of the fields and select Continue
-
Review the details and select Confirm
If you already have an FHSA at Coast Capital:
- Log into digital banking
- From the menu, select Products & Services then Open an Account
- Your GIC will be funded from your FHSA High-Interest Savings Account. If you don’t already have the funds available in that account, perform a transfer first.
- Under Save or Invest in Your FHSA, select See accounts
- Select Open Account for the FHSA GIC type you want to open
- Select your FHSA Savings Account to fund the FHSA GIC from, fill in the rest of the fields and select Continue
- Review the details and select Confirm
If you don’t have an FHSA at Coast Capital yet:
To open an FHSA GIC, first you need an FHSA Savings Account. Once that’s opened, you’ll transfer the funds for your GIC to the savings account, then fund your GIC from that account.
- Open an FHSA Savings Account:
- Log into digital banking
- From the menu, select Products & Services then Open an Account
- Under Save or Invest in Your FHSA, select See accounts
- Select the Open account button
- Answer the home ownership question to declare your eligibility
- Verify your contact information is correct, select your beneficiary type and fill in the rest of the fields
- Select Continue
- Review your details and select Confirm
- Transfer money to the new FHSA High-Interest Savings Account:
- Log in to digital banking
- From the menu, select Transfers then Transfer Funds
- Select the account to transfer money from
- Select your FHSA High Interest Savings Account as the account to transfer to
- Specify the amount and select Continue
- Open an FHSA GIC:
- Log into digital banking
- From the menu, select Products & Services then Open an Account
- Under Save or Invest in Your FHSA, select See accounts
- Select Open Account for the FHSA GIC type you want to open
- Select your FHSA Savings Account to fund the FHSA GIC from, fill in the rest of the fields and select Continue
- Review the details and select Confirm
If you already have a TFSA at Coast Capital:
-
Log in to digital banking
-
From the menu, select Products & Services then Open an Account
-
Under Save or Invest in Your TFSA, select See accounts
-
Select Open Account for the TFSA GIC type you want to open
-
Select your TFSA Savings Account to fund the TFSA GIC from, fill in the rest of the fields and select Continue
-
Review the details and select Confirm
If you don’t have a TFSA at Coast Capital yet:
To open a TFSA GIC, first you need a TFSA Savings Account. Once that’s opened, you’ll transfer the funds for your GIC to the savings account, then fund your GIC from that account.
-
Open a TFSA Savings Account:
-
Log in to digital banking
-
From the menu, select Products & Services then Open an Account
-
Under Save or Invest in Your TFSA, select See accounts
-
Select the Open account button
-
Verify your contact information is correct, select your beneficiary type and fill in the rest of the fields
-
Select Continue
-
Review your details and select Confirm
-
-
Transfer money to the TFSA Savings Account:
-
Log in to digital banking
-
From the menu, select Transfers then Transfer Funds
-
Select the account to transfer money from
-
Select your TFSA Savings Account as the account to transfer to
-
Specify the amount and select Continue
-
-
Open a TFSA GIC:
-
From the menu, select Products & Services then Open an Account
-
Under Save or Invest in Your TFSA, select See accounts
-
Select Open Account for the TFSA GIC type you want to open
-
Select your TFSA Savings Account to fund the TFSA GIC from, fill in the rest of the fields and select Continue
-
Review the details and select Confirm
-
If you already have an RRSP at Coast Capital:
-
Log in to digital banking
-
From the menu, select Products & Services then Open an Account
-
Under Save or Invest in Your RRSP, select See accounts
-
Select Open Account for the RRSP GIC type you want to open
-
Select your RRSP Savings Account to fund the RRSP GIC from, fill in the rest of the fields and select Continue
-
Review the details and select Confirm
If you don’t have an RRSP at Coast Capital yet:
To open an RRSP GIC, first you need an RRSP Savings Account. Once that’s opened, you’ll transfer the funds for your GIC to the savings account, then fund your GIC from that account.
-
Open an RRSP Savings Account:
-
Log in to digital banking
-
From the menu, select Products & Services then Open an Account
-
Under Save or Invest in Your RRSP, select See accounts
-
Select the Open account button
-
Verify your contact information is correct, select your beneficiary type and fill in the rest of the fields
-
Select Continue
-
Review your details and select Confirm
-
-
Transfer money to the RRSP Savings Account:
-
Log in to digital banking
-
From the menu, select Transfers then Transfer Funds
-
Select the account to transfer money from
-
Select your RRSP Savings Account as the account to transfer to
-
Specify the amount and select Continue
-
-
Open an RRSP GIC:
-
From the menu, select Products & Services then Open an Account
-
Under Save or Invest in Your RRSP, select See accounts
-
Select Open Account for the RRSP GIC type you want to open
-
Select your RRSP Savings Account to fund the RRSP GIC from, fill in the rest of the fields and select Continue
-
Review the details and select Confirm
-
When setting up a pre-authorized debit (like a bill payment) or credit (like payroll), you may be asked to provide a void cheque. You can view and download a void cheque using Coast Capital’s digital banking.
-
Log in to digital banking through a computer or our mobile app
-
From the menu, tap Account Overview, then Download Void Cheque
-
Select the account you want the Void Cheque for and confirm your address is correct
-
Click the Export button to download a PDF file containing your void cheque
-
You can save or print this PDF to provide a digital or physical copy
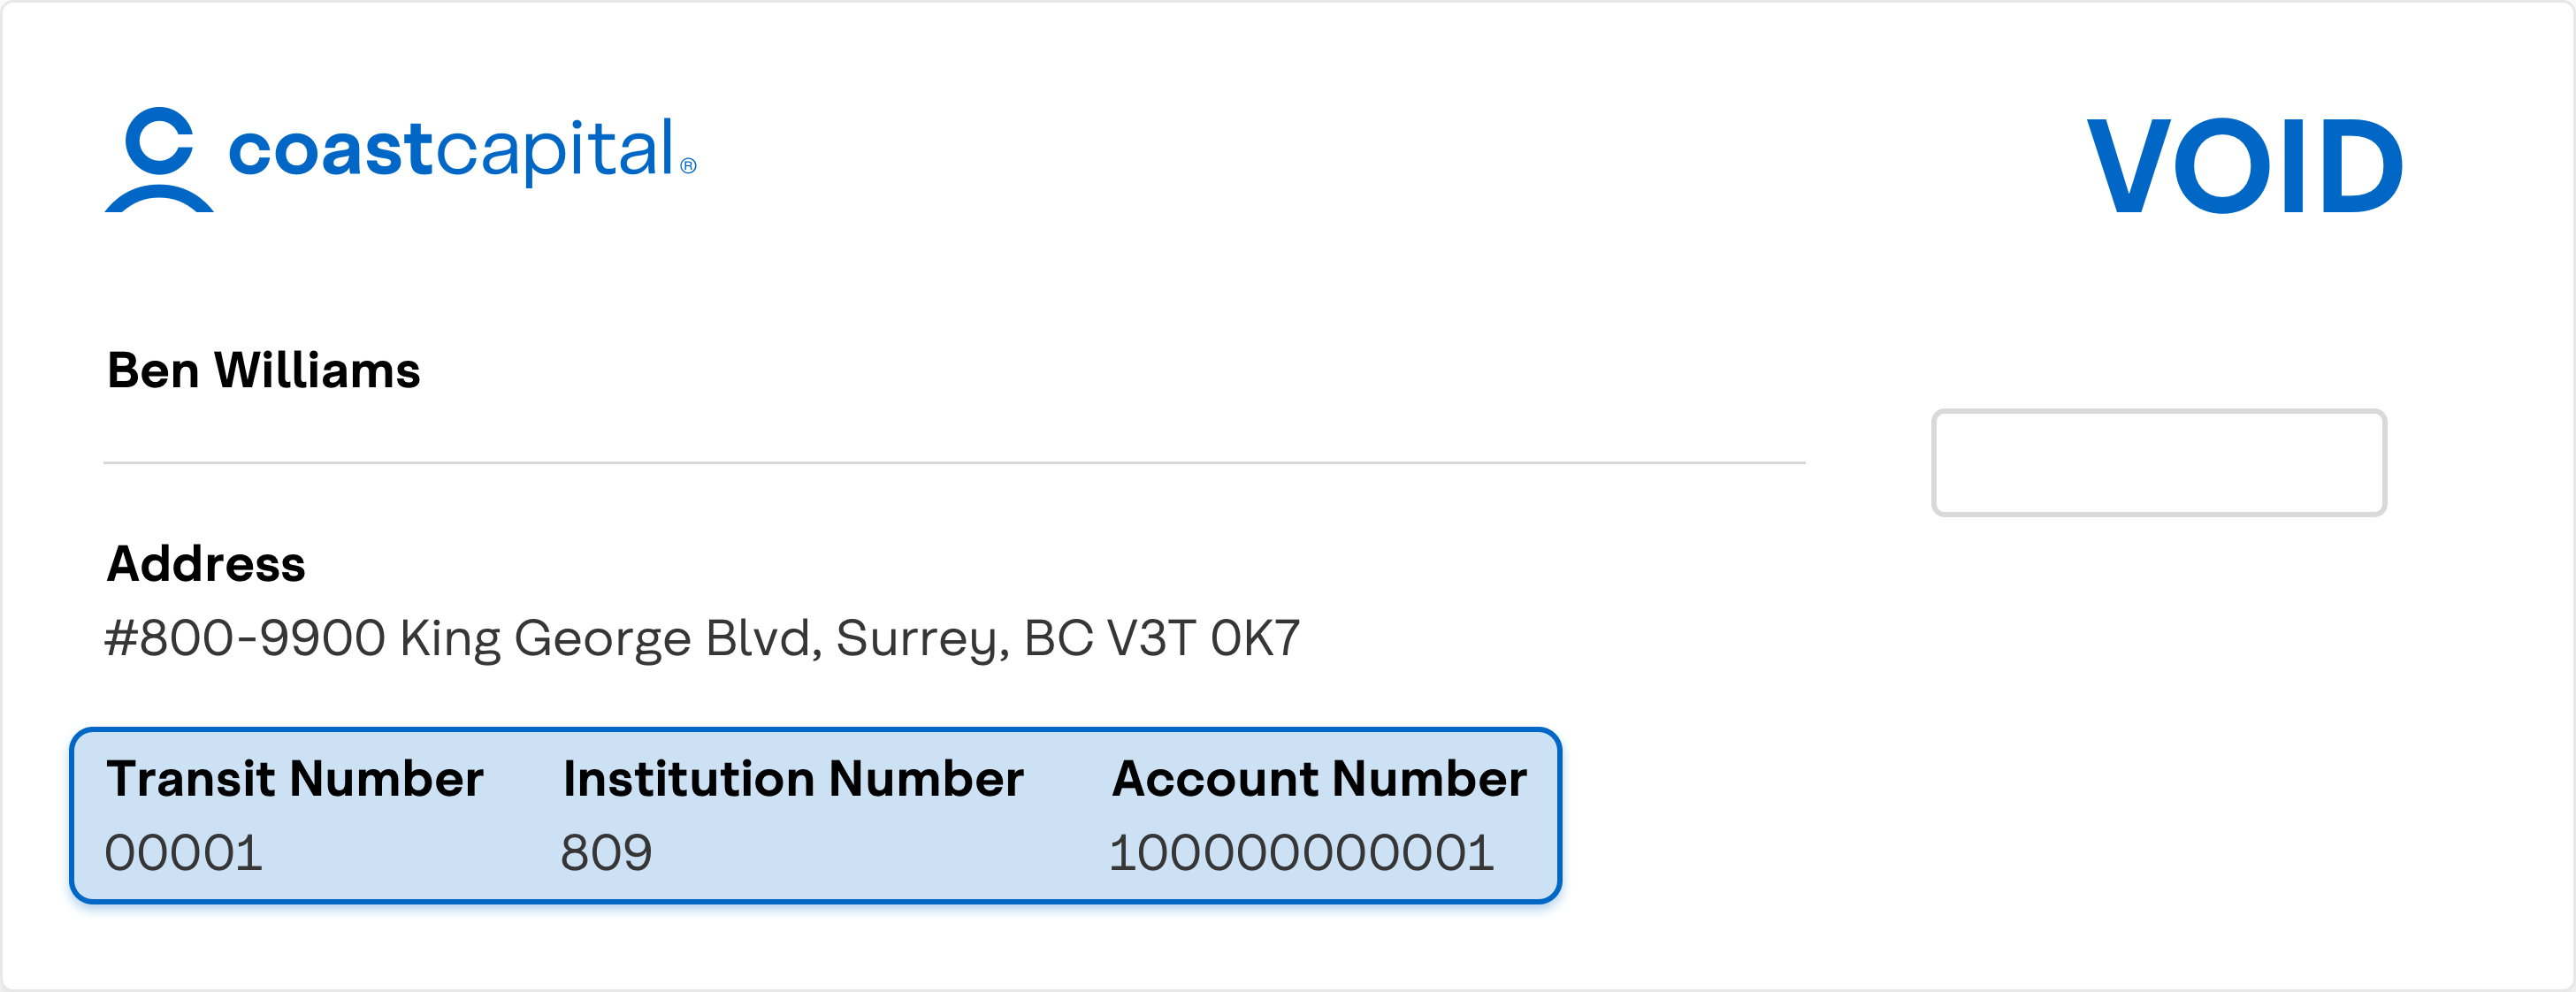
Just need to provide your account information? Here’s where you can find your transit, institution and account numbers on your void cheque:
CRA direct deposit is a secure and convenient way to receive your CRA benefits, like your income tax refund, GST/HST credits and more.
How to enrol:
- Sign in to digital banking through a web browser (this feature is not available on the app)
- From the menu, select “Products & Services”, then “Enrol for CRA Direct Deposit”
- Select the account you want the direct deposit to go into
- Select “Continue” and follow the steps
Pre-authorized payments (also known as pre-authorized debits) are payments that are set up to debit your Coast Capital account and credit a vendor (like a bill payee or gym membership).
Pre-authorized payments are set up directly with the bill vendor, and you can often do this through your online account with them.
What you’ll need:
- Your Coast Capital account information (You can get this easily by downloading a digital void cheque - see the tutorial above).
- Your login details for the bill vendor
How to do it
Here are the step-by-step instructions for some of the most popular bill payees (as of July 2024):
BC Hydro
- Log into your MyHydro account
- Select “Billing & Payments” from the menu
- Select “Ways to pay your bill”
- Select the “Pre-authorized payments” option, then select “Set up auto-pay”
- Fill in your Coast Capital account details and follow the rest of the steps
Fortis BC
- Log into your Fortis BC account
- From the Accounts Summary page, select “Set up Pre-authorized Payment Plan”
- Fill in your Coast Capital account details and follow the rest of the steps
Telus
- Log into your My TELUS account
- From your Overview, select “View and Pay Bill”
- Select “Statements”
- Select the “Recurring Payments” icon for the target account
- Under Payment Account, select “Credit card or bank account”
- Fill in your Coast Capital account details and follow the rest of the steps
Collabria
- Log into your Collabria account
- Select “Make a Payment”
- Select “Manage Payment Accounts”, then select “Add Account”
- Fill in your Coast Capital account details and select “Add Account”.
- Select “Autopay”
- Choose the payment option. Click Schedule.
- Select OK to activate Autopay
Tip: Autopay will take effect on the next statement cycle, so remember to still make your current payment manually.
A direct deposit is a secure electronic transfer of funds deposited directly into your bank account. Direct deposit replaces the need to issue payments by paper cheque.
-
Payroll (if direct deposit is supported by your employer)
-
Income tax refund
-
If eligible, government payments like the Canada Child Benefit (CCB), GST/HST credit, Canada Workers Benefit (CCB) and the Canada Emergency Response Benefit (CERB).
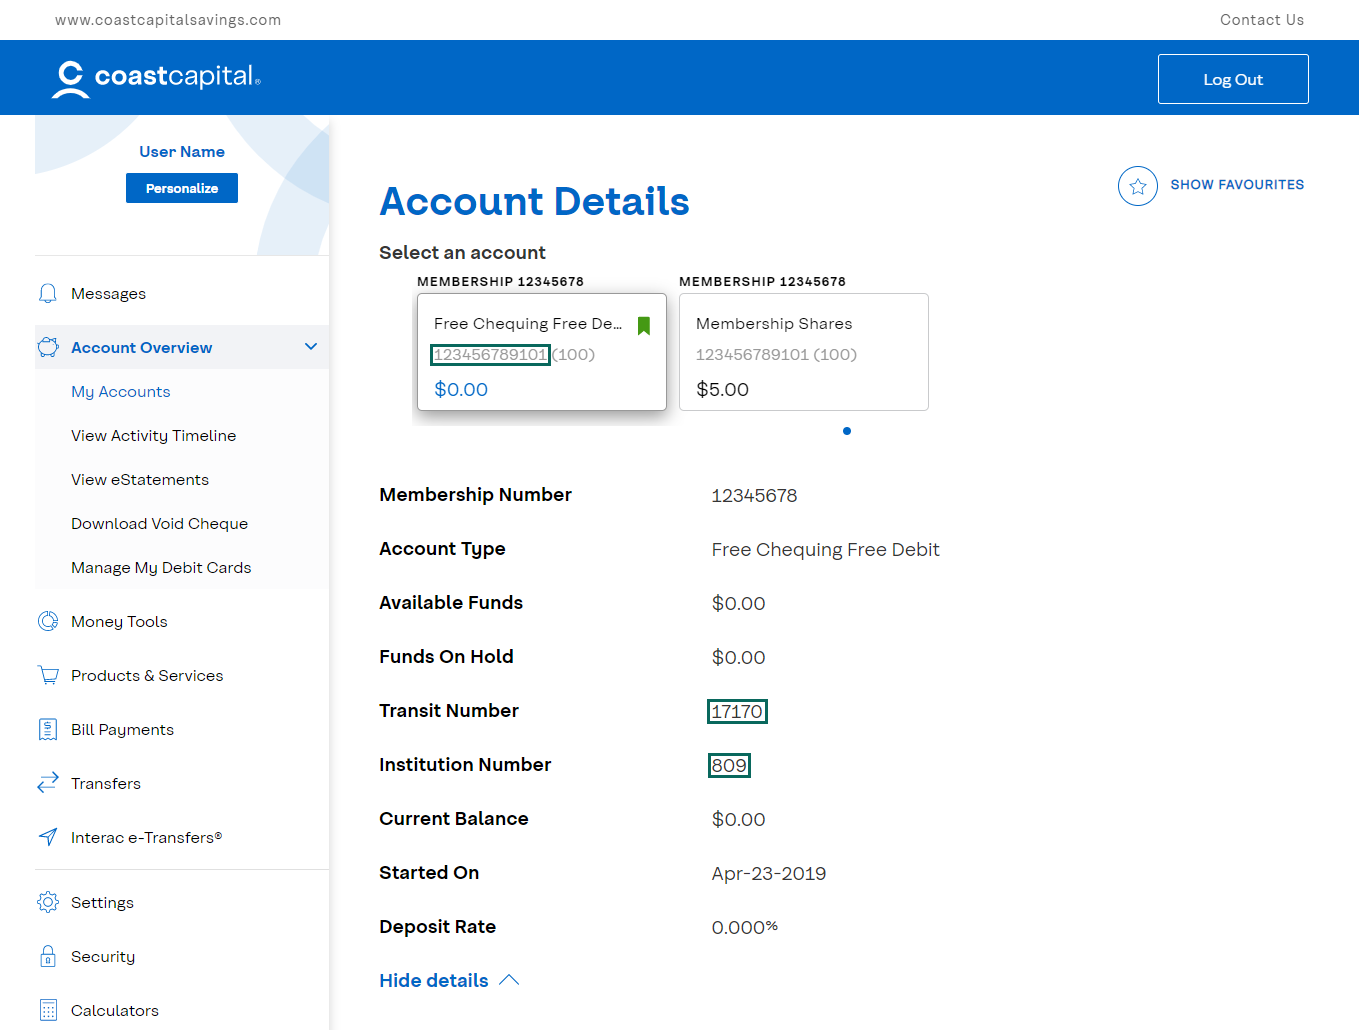
You can find this information in a few places:
- On your personalized cheque
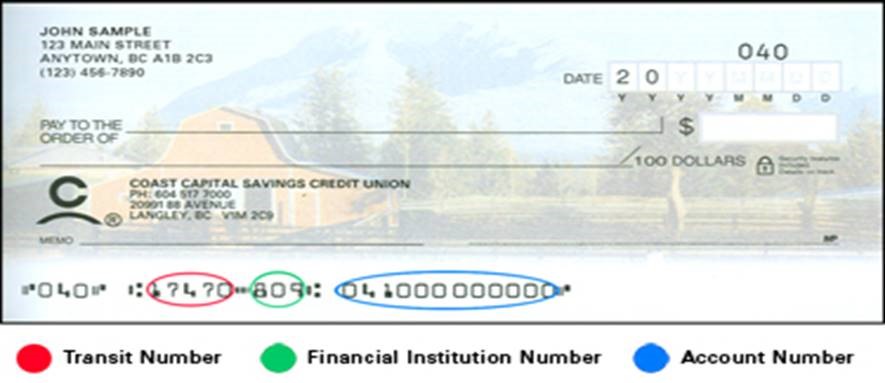
- In digital banking by following these steps:
- Log into digital banking
- From the 'Accounts Overview' screen, click the account you wan this information for
- Click Show more details
- You can also use our void cheque feature. For detailed instructions, check out the "Download void cheque" tutorial above.
In the event your debit card is damaged or lost, you can order a replacement through digital banking.
- Log in to digital banking from a computer or our mobile app
- From the menu, click Account Overview then Manage my debit cards
- Find the card you wish to replace, and click on the Damaged or Lost icon
- Confirm you wish to replace your card
Your old card will be cancelled immediately and your new card will be sent to the address we have on file within 5 to 7 business days.

If you misplace your debit card, you can lock it to prevent unauthorized use, and unlock it once you find it.
- Log in to digital banking from a computer or our mobile app
- From the menu, click Account Overview then Manage my debit cards
- Find the card you wish to lock, and click on the Lock icon
- Confirm you wish to lock your card
Your card will remain locked until you unlock it. Your access to digital banking will not be affected.
If you have already locked your debit card and have located it, you can unlock it to reinstate point-of-sale purchase and ATM access. You will need to be able to receive a one-time security code to unlock your card.
-
Log in to digital banking from a computer or our mobile
-
From the menu, click Account Overview then Manage my debit cards
-
Find the card you wish to unlock, and click on the unlock icon
-
Enter the one-time security code we send to your mobile phone or email and click Confirm
-
Confirm you wish to unlock your card
Your card will remain in Action Required status until you use it at an ATM or to make a point-of-sale purchase.
Watch this video for a full run-down on how to lock and unlock your cards.
Transactional alerts help you keep track of your account activity, including your balance, deposits and credit. Here’s how to turn them on.
- Sign in to digital banking
- From the menu, select Settings, then Alerts & Notifications
- Select Transactional Alerts
- Select the account you wish to receive the alert for
- Select the alert type, and use the toggles to specify how you’d like to receive the alert
- Select Save

Security alerts alert you of security-related activity on your accounts, like login activity, password changes and more. Several of these alerts are automatically turned on for your security.
To learn more about what alerts are turned on, and to turn on login alerts:
- Sign in to digital banking
- From the menu, select Settings, then Alerts & Notifications
- Select Security Alerts
You’ll see the different types of alerts that are turned on. To turn on login alerts:
- Select Login
- Use the toggles to specify how you’d like to receive the alert
- Select Save
Bill payee alerts alert you when a new bill payee is added to your membership. Here’s how to turn it on.
- Sign in to digital banking
- From the menu, select Settings, then Alerts & Notifications
- Select Bill Payee Alerts
- Use the toggles to specify how you’d like to receive the alert
- Select Save
Money Manager alerts help you keep track of your budgets within Money Manager, Coast Capital’s personal financial management tool. Here’s how to turn them on.
- Sign in to digital banking
- From the menu, select Settings, then Alerts & Notifications
- Select Money Manager Alerts
- Select the alert type, and use the toggles to specify how you’d like to receive the alert
- Select Save
Don’t use Money Manager yet?
Money Manager is Coast Capital’s free, personal financial management tool that gives you the control to make smart, informed decisions with your money. Learn about your spending habits, set budgets, track your progress towards your goals and pay down your debt more effectively. Learn more about Money Manager
Personalization
Quickview allows you to check your account balances through our app without having to log in.
-
Log in to digital banking through our mobile app
-
From the menu, tap Personalize my app, then Quick Access Shortcuts
-
Tap the button next to Account Quickview and tap Add Quickview Account
-
Select the options that suit your preferences, then click Add Quickview account
-
You can now view your account balances through the app without logging in by opening the app and swiping right.
Learn more about the different ways you can personalize your digital banking experience:

Save time by creating a list of your frequent transactions with Favourites. This feature is available for Transfers and e-Transfers.
-
Log in to digital banking
-
Complete the transaction that you would like to set as a favorite. Once the transaction is completed, select Add to Favorites
-
Create a name for the transaction and select Add to Favourites
Once you’ve set a transaction as a favourite, you’ll see it saved on your My Accounts dashboard when you log in. Select the Favourite transaction to initiate it.
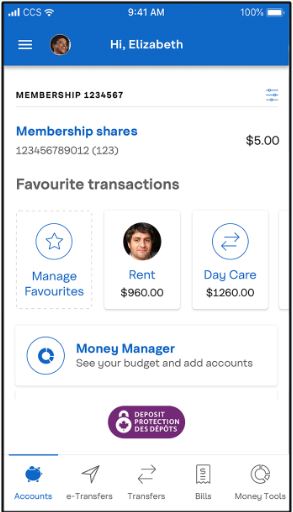
You can also find your Favourites by selecting “Personalize” from the menu, then “Favorite Transactions”.
Make digital banking your own by adding a profile picture to your account.
-
Log in to digital banking
-
From the menu, tap Personalize, then tap Customize Profile Images
-
Set your profile photo:
On our app, you can tap Camera to take a new photo, Upload to use an image from your camera roll or Reset to change the profile picture back to the default image.
On a computer, tap the camera icon to upload an image from your computer
Learn more about the different ways you can personalize your digital banking experience:
If you would like to dedicate an account for a specific purpose like home payments, vacation savings and so on, you can give it a custom name.
-
Log in to digital banking
-
From the menu, tap Personalize, then tap Customize Accounts
-
Click the pencil icon next to the account you want to rename
-
Enter a new name for the account and click the green check icon.
Learn more about the different ways you can personalize your digital banking experience:
-
Log in to digital banking
-
From the menu, tap Security then Change username
-
Follow the prompts on screen
-
When finished, you will be logged out of digital banking. To continue banking, just sign in again.
Please note, when you reset your username, your previous username will not be able to be used again.
To help solve challenges you may experience with digital banking, we may ask you to clear your cache and cookies. Here’s how to do it on a few popular browsers: Chrome, Safari and Firefox. If you use a different browser, a quick Google search should help you.
Chrome (Windows and Mac)
Clearing cache and cookies
- Open Chrome on your computer
- If you’re using Windows, click the More button “
 ” at the top right of the browser, then “More tools”
- On a Mac, click “Chrome” from the menu bar at the top of your browser
- Click “Clear Browsing Data”
- Select “All time”
- Check the boxes next to “Cookies and other site data” and “Cached images and files”
- Click “Clear Data”
Safari (Mac)
Clearing cache
- Open Safari on your computer
- Use shortcut Command+Shift+E OR
- Click “Safari” in the browser menu bar, then “Preferences”
- Click “Advanced” and check the box next to “Show Develop menu in menu bar”
- Click “Develop” from menu bar, then “Empty cache”
Clearing cookies
- Click “Safari” in the browser menu bar
- Click “Preferences” then “Privacy”
- Click “Manage Website Data”
- Click “Remove All”
Firefox
Clearing cache and cookies
- Open Firefox on your computer
- Click the Menu button “
 ” on the right of your browser bar
 - Click “Preferences”
- Click “Privacy and Security”
- Click “Clear Data”
- Check the boxes next to “Cookies and Site Data” and “Cached Web Content”
- Click “Clear”
To help solve challenges you may experience with digital banking, we may ask you to access digital banking using a private browser (also known as Incognito). Here’s how to do it on a few popular browsers: Chrome, Safari and Firefox. If you use a different browser, a quick Google search should help you.
Chrome (Windows and Mac)
- Open Chrome on your computer
- Click the More button “” at the top right of the browser (Windows) or “File” from the menu bar at the top of your browser (Mac)
- Click “New Incognito Window”
- A new window will open for you to use
Safari (Mac)
- Open Safari on your computer
- Click “File”
- Click “New Private Window”
- A new window will open for you to use
Firefox
- Open Firefox on your computer
- Click the Menu button “” on the right of your browser bar
- Click “New Private Window”
- A new window will open for you to use
To display your Worldsource Financial Management investment balances, follow these steps:
- Log in to digital banking
- From the menu, tap Partner Accounts, then Display Preferences
- Under Worldsource, tap Display
- Review the conditions and tap Display Worldsource accounts
Your Worldsource Financial Management balances will now be displayed on your My Accounts dashboard.
To hide your displayed Worldsource Financial Management investment balances, follow these steps:
- Log in to digital banking
- From the menu, tap Partner Accounts, then Display Preferences
- Under Worldsource, tap Hide
Your Worldsource Financial Management balances will no longer be displayed on your My Accounts dashboard. You can change this back at any time.