Digital Banking Support
Menu
Questions about digital banking?
Check out our tutorials and common questions to learn how to get the most out of your digital banking experience.
Explore topics
Log into digital banking
Tutorials
Learn how to set up your new username, password and security code credentials on our Getting Started page.
Simplify your login experience by setting up your phone’s biometric login features (if applicable).
-
Follow your device’s instructions for turning Fingerprint ID or Touch ID on
-
Log in to the Coast Capital app
-
From the menu, click Security
-
Click Set up Fingerprint/Touch ID
Common Questions
Yes. Our Advice Centre will use your PAN and PAC to verify your identity when you call. They are also required to use Coast-by-Phone®.
No problem! Just click “Forgot username” from the login page and follow the instructions to recover it. If you have forgotten both your username and password, please contact us at 1.888.517.7000.
It’s a 7 or 8 digit security code that we’ll send you through a text message to your mobile phone or through email when you do the following:
-
Add a new bill vendor
-
Update contact information
-
Add an e-Transfer recipient
-
Change your password
If our system detects unusual activity, like logging in from a new device or location, you might be asked to enter a security code when you log in. From time-to-time, this might also happen while paying a bill or transferring funds.
Accessing Digital Banking on a computer
Supported Desktop Browsers
To provide you with a secure and protected online banking environment, we support the browsers listed below on Windows and Mac OS. We do not support beta or test versions of browsers.
-
Apple Safari (latest version)
-
Google Chrome (latest version)
-
Mozilla Firefox (latest version)
-
Microsoft Edge (latest version)
-
Microsoft Internet Explorer 11
Supported Mobile browsers
-
Apple Safari on iOS 13 or higher
-
Google Chrome on Android 5 or later
To access online banking through your mobile browser, simple visit https://banking.coastcapitalsavings.com.
Transport Layer Security (TLS) Encryption
TLS stands for Transport Layer Security (TLS). This technology allows users to establish sessions with Internet sites that are secure, meaning they have minimal risk of external violation. Once inside the Coast Online Banking site, you are secure through our use of SSL technology. Encryption is the process of scrambling information into a more secure format for transmission. This means that plain text is converted (encrypted) to a scrambled code while transmitting, and then changed back (decrypted) to plain text at the receiving end of the transmission.
Cookies
Coast Online Banking uses two kinds of cookies - session cookies and persistent cookies. We use a session cookie to maintain the integrity of your Internet banking session, and we use persistent cookies in optional enhanced features such as the saved Member Cards and saved member transfers features. For more information on our use of cookies, please review the cookies section in our Privacy Policy.
To use digital banking, you must ensure that you have not disabled your browsers’ ability to accept cookies (particularly first-party session cookies). For more information on enabling, and disabling cookies within your browser, please review your browsers’ help section.
JavaScript
To view interactive elements of our site and log in to Coast Online Banking, you must enable your computer's web browser to accept JavaScript. For more information on enabling Javascript within your browser, please review your browsers’ help section.
Coast Capital Mobile App
To use our app efficiently, your phone needs to meet the following requirements:
-
Apple Safari on iOS 13 or higher
-
Google Chrome on Android 5 or later
Downloading the App
From your device, open the App Store (Apple) or Google Play (Android) and search “Coast Capital Savings”. Make sure to download the correct app version, which has a white background and blue logo:

Pay Bills
Tutorials
You only need to do this once per vendor. After that, you can make your payments quickly and easily.
-
Log in to digital banking
-
From the menu, click Bill Payments and select Manage Payees
-
Click the + symbol if you’re using our app, or the Add Payee button if you’re on Coast Online® Banking
-
Search for the vendor name and enter your account number
-
Confirm your selection
If you pay the same amount to the same vendor on the same date each month, consider setting up a recurring bill payment and let us do the rest.
-
Log in to digital banking
-
From the menu, click Bill Payments and select Pay Bills
-
Click the Schedule Recurring Payments tab and set the vendor, amount and frequency of the payment
You can schedule bill payments up to one year in advance.
-
Log in to digital banking
-
From the menu, click Bill Payments and select Pay Bills
-
Specify the vendor and amount you with to pay
-
Change the payment date and click Confirm
You can review and edit your scheduled payments by clicking on View Scheduled Payments from the menu.
If your transaction hasn’t been processed yet and you made an error, you can cancel your bill payment from within digital banking.
-
Log in to digital banking
-
From the menu, click Bill Payments and then View Scheduled Payments
-
Find the payment you wish to cancel and click on the trash icon next to it
-
Confirm the cancellation
If your payment does not appear on the “View Scheduled Payments” screen, your payment may have been processed already. Please contact us and be aware a cancellation service fee may apply.
Common Questions
You can pay up to five bills in one transaction.
-
On Coast Online® Banking, you can simply enter additional payments on the same screen.
-
On the mobile app, when you’re done entering the payment information for the first bill you wish to pay, scroll down and click the Pay Another Bill button.
Sure can! Here’s how to do it:
-
Log in to online banking
-
From the menu, click Bill Payments and then Manage Payees
-
Add your city as a payee (ex. Surrey Property Tax) and register your account number
If you’re applying for a Home Owner Grant, please note we no longer forward applications. Please refer to your Property Tax Notice for details on how you can apply for the grant.
Transfers
Tutorials
To transfer money between accounts in your own membership:
-
Log in to digital banking
-
From the menu, click Transfers then Transfer Funds
-
Select the account to make the transfer from and where it will transfer to
-
Specify the amount and click Continue
You also have the option to on this screen schedule a transfer in the future. You can also set up a recurring transfer, which is a great way to build your savings account.
Visit the External Accounts section of this page for more information about external account transfers.
-
Log in to digital banking
-
From the menu, click Transfers then Transfer Funds
-
Select the account you wish to transfer funds from
-
Select Transfer to another member and enter their membership number
-
Specify the amount and click Continue
Saving is easy when you “set it and forget it”. You can do that by setting a recurring transfer from one account to a savings account. This works great if your payroll is automatically deposited into your chequing account on a regular basis, and you set the transfer date based on when your payroll is deposited.
-
Log in to digital banking
-
From the menu, click Transfers then Transfer Funds
-
Select the account to make the transfer from and where it will transfer to
-
Under Schedule transfer, change the selection to Recurring transfer
-
Specify the amount, start date, frequency and end date
-
Click Continue
Interac e-Transfers® are a safe and secure way to send funds outside of Coast Capital. Learn how.
Visit the Transfer a TFSA or RRSP section of this page for more information about transferring TFSAs, RRSPs, RRIFs and FHSAs.
Common Questions
You can transfer to and from your own USD chequing accounts just like a CAD funds transfer. Unfortunately, you are unable to transfer USD outside of your membership at this time.
If you have a recurring or scheduled transfer you would like to cancel, follow these steps.
-
Log in to digital banking
-
From the menu, click Transfers then View Upcoming Transfers
-
Click the trash icon next to the transfer you wish to cancel
-
Transfers within same membership: No limit
-
Transfers to another membership: $10,000/ day
Please contact us to reverse a transfer to your TFSA or RRSP.
External Account Transfers
Tutorials
Watch our video or read our step-by-step instructions.
- From the menu, select External Accounts
- Select Link external account
- Search for an external financial institution
- After selecting the financial institution, enter the login information for the external account
- If prompted, enter the security code or follow security verification instructions (these instructions will vary by financial institution and are not controlled by Coast Capital)
- Select which external account to connect
- Once the account is connected, you’ll receive a message and be taken back to the External Accounts page, where you’ll now see the account connected. It may take up to five minutes for the account to fully be linked
Watch our video or read our step-by-step instructions.
- From the menu, select Transfers, then External Account Transfer
- Select the external account to transfer from
- Select Coast Capital account to deposit into
- Enter transfer amount
- Specify the timing for the transfer
- Select Continue, review the transfer details and select Confirm
- Accept the Terms and Conditions
Visit the Transfer a TFSA or RRSP section of this page for more information about transferring TFSAs, RRSPs, RRIFs and FHSAs.
Common Questions
No, the service is free.
It depends on the timing selection you make.
- Initiate now: The transfer is initiated immediately and should take 3-6 business days for funds to arrive in your Coast Capital account
- Later: You’ll select the date you want the transfer to initiate. The transfer should arrive 3 business days after the date you select
- Recurring: You’ll select the date you want the transfer to initiate. The transfer should arrive 3 business days after the date you select, and then on the regular interval you define (weekly, monthly, etc.)
Any pre-authorized debits you’ve set up in-branch or with our Advice Centre will not be visible in External Accounts. If you need help with a previously set up pre-authorized debit, please contact us.
We’ve partnered with Flinks, a trusted financial services provider, to bridge the connection between Coast Capital and other financial institutions and verify members’ account information. Coast Capital does not store any external account banking credentials, and we ensure all information is deleted from Flinks’ systems after the account is linked.
Flinks has some of the leading financial institutions in Canada as its clients and prides itself in providing seamless and secure data transfer. Below are some of it’s benefits:
- Fast: Connections with accounts happen in seconds
- Secure: Encryption helps protect personal financial information
- Private: Banking credentials are never made accessible to Coast Capital
If you need to cancel or change a transfer, please call us at 1.888.517.7000, Monday-Saturday, 8 am-8 pm; Sunday 9 am-5:30 pm PT.
- For “Initiate now” transfers, cancellation or change requests must be made same-day
- For “Later” and “Recurring” transfers, cancellation or change requests must be made a minimum of 3 business days in advance of the initiation date
Transfer a TFSA, RRSP or RRIF
Tutorials
- Log into digital banking on web or our Android app (Coming soon to our iOS app)
- From the menu, select Transfers, then Transfer a TFSA or RRSP
- Select the type of account you want to transfer funds from
- Funds must be transferred into the same type of account it’s being transferred from (e.g. TFSA to TFSA). If you do not yet have that account type at Coast Capital, you will be prompted to open one first. You can then come back to this page to start the transfer.
- Fill in the form with your other financial institution details and the amount you wish to transfer
- Review the details and confirm the request
What happens next?
- We’ll email you a request for a digital signature within three business days
- Funds should arrive 2-3 week after we receive your digital signature
- The funds will be deposited into the High-Interest Savings Account associated with your plan type (TFSA, RRSP etc)
Common Questions
With this method of transferring, there are no tax implications for transfers between accounts in the same type of plan (i.e. TFSA to TFSA, RRSP to RRSP and so on).
There is no fee from Coast Capital. Please consult the financial institution you are transferring from to learn about any potential fees they may charge.
Interac e-Transfers®
Tutorials
There are two ways to add a recipient.
Add a recipient via Manage Recipients:
-
Log in to digital banking
-
From the menu, select Interac e-Transfers then Manage Recipients
-
Select the Add new recipient button
-
Enter the recipient’s name, preferred language, and how you'd like to send notifications by: email and/or mobile phone
-
Set a security question and answer that only you and the recipient know the answer to
-
Select Continue, review the recipient's details and select Confirm
-
Enter the security code and select Confirm
Add a recipient when sending an e-Transfer:
-
Log in to digital banking
-
From the menu, select Interac e-Transfers then Send e-Transfer
-
Select the Add new button by the Transfer to field
-
Enter the recipient's name, preferred language, how you'd like to send notifications by: email and/or mobile phone, and select either One-time recipient (will not be saved to your recipient list) or Saved recipient (recipient will be added to recipient list for future use)
-
Set a security question and answer that only you and the recipient know the answer to
-
Select Continue, and your recipient will populate in the Transfer to field
-
Log in to digital banking
-
From the menu, select Interac e-Transfers then Send e-Transfer
The first time you access this, you will be prompted to create a profile registering your email or email and mobile phone number. This is how others will send you e-Transfers in the future.
-
Select the account you wish to transfer money from
-
Select an existing recipient or add a new recipient
-
Enter the amount of the e-Transfer
-
Select Continue, review the e-Transfer details and select Confirm
Things to know
-
The amount will be debited from your account immediately, plus a $1.50 service fee (depending on your account type)
-
If the recipient is not registered for Autodeposit, they will get a notification within about 30 minutes inviting them to accept the e-Transfer. They will need to answer the security question you set up for them.
-
If the recipient is registered for Autodeposit, the funds will be automatically deposited into their account
When someone sends you an e-Transfer, you will get a notification through email or text message.
-
Check the link provided in the email or text notification to ensure it is encrypted (look for "https:" instead of "http:" in the link URL)
-
Select the link to access a secure Interac website
-
Once Coast Capital is selected as the financial institution, you'll be redirected to Coast Capital's digital banking login page or mobile app
-
Log in to digital banking
-
Select which account you wish to make your deposit and answer the security question
-
Select Continue, review the e-Transfer details and select Confirm
For your security and convenience, we recommend setting up Autodeposit so your e-Transfers are automatically deposited into the account of your choice. You won’t have to enter a security answer each time you receive an e-Transfer, saving you time and leaving no opportunity for a fraudster to intercept the transaction.
-
Log in to digital banking
-
From the menu, select Interac e-Transfers then Autodeposit
-
Select the Register Autodeposit button
-
Register with either your email address or mobile phone number, and specify the account the funds will be deposited to
-
Check the box to acknowledge the statements
-
Select Continue, review the Autodeposit details and select Confirm
-
You will receive a verification email from Interac with steps to complete your Autodeposit registration
Friend owes you for lunch? Send them an e-Transfer Money Request to request payment.
-
Log in to digital banking
-
From the menu, select e-Transfers then Request e-Transfer
-
Fill in the e-Transfer request fields
-
Select Continue, review the request details and select Confirm
Things to know
-
Depending on the account type, there is a $1.50 service fee per request sent
-
The recipient of the request will receive a notification within 30 minutes of you sending the request
- The request will expire in 30 days
When someone sends you an e-Transfer Money Request, you will get a notification through email or text message.
-
Check the link provided in the email or text notification to ensure it is encrypted (look for "https:" instead of "http:" in the link URL)
-
Select the link to access a secure Interac website
-
Log in to digital banking
-
Select which account you wish to send money from
-
Check the box to acknowledge the statement
-
Select Continue, then review the request details and select Confirm
Common Questions
-
An Interac e-Transfer® is a quick and secure way to transfer funds to and from your Coast Capital membership.
-
All you need is the recipient’s mobile phone number or email address.
-
There is no service fee to receive an e-Transfer. Depending on your account type, it’s $1.50 to send an e-Transfer, including sending an e-Transfer request.
If a recipient has not yet accepted the e-Transfer, you can cancel it.
-
Log in to digital banking
-
From the menu, select Interac e-Transfers then Pending e-Transfers
-
Select the trash icon beside the e-Transfer you wish to cancel
-
Confirm you want to cancel the e-Transfer
There is no fee to receive an e-Transfer. Depending on your account type, it’s $1.50 to send an e-Transfer, including sending an e-Transfer request.
It can take up to 30 minutes for the recipient to receive a notification.
You can resend the notification.
-
Log in to digital banking
-
From the menu, select Interac e-Transfers then Pending e-Transfers
-
Select the rounded arrow icon beside the e-Transfer to re-notify the recipient
-
Cancel the e-Transfer
-
Update the recipient’s details. Access this by selecting on Interac e-Transfers from the menu, then Manage Recipients
-
Select the pencil icon and edit the recipient’s information
-
Select Continue, review the recipient's details and select Confirm
-
Enter the security code and select Confirm
-
Resend the e-Transfer
You can view the last 24 months of your sent e-Transfer history in digital banking.
-
Log in to digital banking
-
From the menu, select Interac e-Transfers then e-Transfer History
-
Select the Search filters button and select a date range and/or a status, then select Search
-
You can search for up to 365 days per search
-
-
On the results page, you can select the details icon to view more information about the e-Transfer
Some received e-Transfers will have additional details if the sending financial institution supports this feature. These details could include additional payee/payor information, or additional invoice or document notes. At this time, it is not possible to include these details in e-Transfers sent from Coast Capital.
If the sending financial institution supports the sending of e-Transfers in real-time and you have the Autodeposit feature enabled, you will receive your deposit immediately. The Autodeposit feature allows you to receive e-Transfers without needing to provide a security answer.
If the sending financial institution supports account-to-account e-Transfers, the sender may also send a real-time e-Transfer using your account, institution, and transit number. Contact the person sending the e-Transfer to confirm if their institution supports this feature.At this time, it is not possible to send an e-Transfer from Coast Capital using an account number. However, we do support Autodeposit. If the recipient has Autodeposit enabled, they should receive your e-Transfer in close to real-time.
- Log in to digital banking
- From the menu, select Interac e-Transfers then Autodeposit
- Select the trash icon beside the email address or mobile phone number you wish to delete (on our app, the trash icon appears once you select the ellipsis “
 ” beside the email address or mobile phone number)
 - Confirm you want to delete the email address or mobile phone number
- Enter the security code and select Confirm
Please note, to fully unregister from Autodeposit, all registered email addresses and mobile phone numbers must be deleted.
Cheques
Tutorials
- Log into digital banking
- From the menu, select Products & Services
- Select Order Cheques
- Fill in the fields, verify your address and click Continue
- Review your order details and click Confirm
Lost a cheque? You can create a Stop Cheque to prevent the cheque from processing.
- Log into digital banking through a computer or a mobile web browser (this feature is not available on our app)
- From the menu, select Products & Services
- Select Stop Cheques
- Click the Create Stop Cheque button
- Enter the details of the cheque(s)
- Check off the boxes to indicate that you’ve read and agree to the service fee and Stop Payment Disclaimer and Indemnity
- Click Continue
- Review the details and click Confirm
Deposit On-the-go
Tutorials
-
Log in to digital banking through our mobile app
-
From the menu, tap Deposit On-the-go
-
Specify which account you’d like to deposit your cheque in to and enter the amount of the cheque
-
Tap Take Photo and follow the instructions on the screen
-
Tap Confirm to deposit the cheque
Things you should know
Sign the back of your cheque before you photograph it
Keep the cheque for 90 days, then destroy it within the next 30 days
Holds may apply when you deposit cheques through Deposit On-the-go or an ATM. If you’re unsure what your hold policy is, contact us.
You may be subject to mobile charges. Please consult your phone provider for more details.
Common Questions
Deposit On-the-go is a quick, safe way to deposit cheques with your mobile phone through the Coast Capital app.
You can deposit Canadian cheques, money orders, bank drafts, convenience cheques and certified cheques without having to visit a branch or ATM.
No, there are no fees to use Deposit On-the-go. You may be subject to mobile phone charges. Please contact your phone provider for details.
Funds will show up right away. Holds may apply when you deposit cheques using Deposit On-the-go or an ATM. If you’re not sure what your hold policy is, contact us.
Take your photos under bright lighting with minimal shadows and make sure the entire cheque is visible in the frame. In most cases, this will resolve the issue.
If you’re still experiencing problems, try these troubleshooting steps:
-
Click Settings on your phone
-
Scroll down to the application manager or the app list
-
Click on the Coast Capital app and clear the cache
-
Once cleared, click on the Camera app in the application manager/app list
-
Click “Force Stop”
-
Open the Camera to test a picture
-
Open the Coast Capital app and try using Deposit On-the-go again
Open Accounts
Tutorials
-
Log in to digital banking
-
From the menu, select Products & Services then Open an Account
-
Under Day-to-Day Banking, select See accounts
-
Select Open account for the account you want to open
-
Fill in the fields and select Continue
-
Review the details and select Confirm
Opening a USD account? If it's your first account at Coast Capital, open a membership first, then follow the steps above.
- Log into digital banking
- From the menu, select Products & Services then Open an Account
- Under Save or Invest in Your FHSA, select See accounts
- Select the Open account button
- Answer the home ownership question to declare your eligibility
- Verify your contact information is correct, select your beneficiary type and fill in the rest of the fields
- Select Continue
- Review your details and select Confirm
-
Log in to digital banking
-
From the menu, select Products & Services then Open an Account
-
Under Save or Invest in Your TFSA, select See accounts
-
Select the Open account button
-
Verify your contact information is correct, select your beneficiary type and fill in the rest of the fields
-
Select Continue
-
Review your details and select Confirm
First account at Coast Capital? Open a membership first, then follow the steps above.
-
Log in to digital banking
-
From the menu, select Products & Services then Open an Account
-
Under Save or Invest in Your RRSP, select See accounts
-
Select the Open account button
-
Verify your contact information is correct, select your beneficiary type and fill in the rest of the fields
-
Select Continue
-
Review your details and select Confirm
First account at Coast Capital? Open a membership first, then follow the steps above.
-
Log in to digital banking
-
From the menu, select Products & Services then Open an Account
-
Under Earn Guaranteed Interest, select See accounts
-
Select Open account for the GIC type you want to open
-
Select the account you wish to fund the GIC from, fill in the rest of the fields and select Continue
-
Review the details and select Confirm
If you already have an FHSA at Coast Capital:
- Log into digital banking
- From the menu, select Products & Services then Open an Account
- Your GIC will be funded from your FHSA High-Interest Savings Account. If you don’t already have the funds available in that account, perform a transfer first.
- Under Save or Invest in Your FHSA, select See accounts
- Select Open Account for the FHSA GIC type you want to open
- Select your FHSA Savings Account to fund the FHSA GIC from, fill in the rest of the fields and select Continue
- Review the details and select Confirm
If you don’t have an FHSA at Coast Capital yet:
To open an FHSA GIC, first you need an FHSA Savings Account. Once that’s opened, you’ll transfer the funds for your GIC to the savings account, then fund your GIC from that account.
- Open an FHSA Savings Account:
- Log into digital banking
- From the menu, select Products & Services then Open an Account
- Under Save or Invest in Your FHSA, select See accounts
- Select the Open account button
- Answer the home ownership question to declare your eligibility
- Verify your contact information is correct, select your beneficiary type and fill in the rest of the fields
- Select Continue
- Review your details and select Confirm
- Transfer money to the new FHSA High-Interest Savings Account:
- Log in to digital banking
- From the menu, select Transfers then Transfer Funds
- Select the account to transfer money from
- Select your FHSA High Interest Savings Account as the account to transfer to
- Specify the amount and select Continue
- Open an FHSA GIC:
- Log into digital banking
- From the menu, select Products & Services then Open an Account
- Under Save or Invest in Your FHSA, select See accounts
- Select Open Account for the FHSA GIC type you want to open
- Select your FHSA Savings Account to fund the FHSA GIC from, fill in the rest of the fields and select Continue
- Review the details and select Confirm
If you already have a TFSA at Coast Capital:
-
Log in to digital banking
-
From the menu, select Products & Services then Open an Account
-
Under Save or Invest in Your TFSA, select See accounts
-
Select Open Account for the TFSA GIC type you want to open
-
Select your TFSA Savings Account to fund the TFSA GIC from, fill in the rest of the fields and select Continue
-
Review the details and select Confirm
If you don’t have a TFSA at Coast Capital yet:
To open a TFSA GIC, first you need a TFSA Savings Account. Once that’s opened, you’ll transfer the funds for your GIC to the savings account, then fund your GIC from that account.
-
Open a TFSA Savings Account:
-
Log in to digital banking
-
From the menu, select Products & Services then Open an Account
-
Under Save or Invest in Your TFSA, select See accounts
-
Select the Open account button
-
Verify your contact information is correct, select your beneficiary type and fill in the rest of the fields
-
Select Continue
-
Review your details and select Confirm
-
-
Transfer money to the TFSA Savings Account:
-
Log in to digital banking
-
From the menu, select Transfers then Transfer Funds
-
Select the account to transfer money from
-
Select your TFSA Savings Account as the account to transfer to
-
Specify the amount and select Continue
-
-
Open a TFSA GIC:
-
From the menu, select Products & Services then Open an Account
-
Under Save or Invest in Your TFSA, select See accounts
-
Select Open Account for the TFSA GIC type you want to open
-
Select your TFSA Savings Account to fund the TFSA GIC from, fill in the rest of the fields and select Continue
-
Review the details and select Confirm
-
If you already have an RRSP at Coast Capital:
-
Log in to digital banking
-
From the menu, select Products & Services then Open an Account
-
Under Save or Invest in Your RRSP, select See accounts
-
Select Open Account for the RRSP GIC type you want to open
-
Select your RRSP Savings Account to fund the RRSP GIC from, fill in the rest of the fields and select Continue
-
Review the details and select Confirm
If you don’t have an RRSP at Coast Capital yet:
To open an RRSP GIC, first you need an RRSP Savings Account. Once that’s opened, you’ll transfer the funds for your GIC to the savings account, then fund your GIC from that account.
-
Open an RRSP Savings Account:
-
Log in to digital banking
-
From the menu, select Products & Services then Open an Account
-
Under Save or Invest in Your RRSP, select See accounts
-
Select the Open account button
-
Verify your contact information is correct, select your beneficiary type and fill in the rest of the fields
-
Select Continue
-
Review your details and select Confirm
-
-
Transfer money to the RRSP Savings Account:
-
Log in to digital banking
-
From the menu, select Transfers then Transfer Funds
-
Select the account to transfer money from
-
Select your RRSP Savings Account as the account to transfer to
-
Specify the amount and select Continue
-
-
Open an RRSP GIC:
-
From the menu, select Products & Services then Open an Account
-
Under Save or Invest in Your RRSP, select See accounts
-
Select Open Account for the RRSP GIC type you want to open
-
Select your RRSP Savings Account to fund the RRSP GIC from, fill in the rest of the fields and select Continue
-
Review the details and select Confirm
-
Common Questions
When opening a GIC, we will ask you which account you want to fund the GIC from. If you are opening an RRSP or TFSA GIC, you need to fund it from an existing TFSA or RRSP account in your Coast Capital membership. Likewise, if you are opening a regular GIC, it cannot be funded from a TFSA or RRSP account.
If you are opening a TFSA or RRSP GIC and don’t have any funds in your existing TFSA or RRSP, simply perform a transfer into the account first. Remember to be aware of your contribution limits when making TFSA and RRSP deposits.
Some products are not available online. If you see something on our website that isn’t available in digital banking, please visit a branch or contact us at 1.888.517.7000.
Once an account or GIC is open, you will be able to view it in your Account Overview.
Eligibility requirements for TFSAs:
- Must be a resident of Canada for tax purposes
- Be the legal age of majority*
- Have a valid SIN
Eligibility requirements for RRSPs:
- Must be a resident of Canada for tax purposes
- Be age 18 to 70
- Have earned income in Canada
Eligibility requirements for FHSAs:
- Must be a resident of Canada for tax purposes
- Be the legal age of majority*
- Have a valid SIN
- Be a first-time home buyer by the following definition:
-
- You did not, in this calendar year, or in the previous four calendar years, inhabit as a principal place of residence either (A) a home located in Canada or elsewhere, or (B) a share of a cooperative housing corporation which entitled the owner to possession of a home in Canada or elsewhere, that was owned (fully or jointly) by you or your spouse or common-law partner.
* Legal age of majority: 18 – Alberta, Manitoba, Ontario, Prince Edward Island, Quebec, Saskatchewan 19 – British Columbia, New Brunswick, Newfoundland, Northwest Territories, Nova Scotia, Nunavut, Yukon
Document Delivery
Tutorials
- Log in to digital banking
- From the menu, select Settingsthen Document Delivery
- Specify which memberships you would like to opt into digital delivery
- Select whether or not you would like to receive email notification when your documents are ready
- Select Continue, review your details and select Confirm
Things you should know
- You’ll receive your first eStatement on the next statement cycle
- If you’re eligible for a T5 slip (you earn interest totaling $50 or more on non-registered funds in a membership), you will receive it annually around the second week of February
- Depending on when you opted in to digital delivery, you may receive one final paper statement for your statement and/or T5 slip
- Your eStatements and T5 slips will be available in digital banking under Account Overview
Common Questions
Digital delivery is a free and environmentally friendly alternative to paper documents and statements.
Key features:
- It's free. Coast Capital eStatements and digital T5 slips are free.
- It's convenient. Access your current and past documents anytime from your computer or laptop. We'll even send you an email to let you know when the document is ready for viewing in digital banking.
- It's secure. Your documents are securely held in digital banking. Only you can log in to access your information.
- It's space-saving. There's no need for you to file and store piles of paper any longer. Your documents are securely saved and accessible for seven years.
No, digital delivery will replace your paper monthly statements and T5 slips.
There’s no fee for digital delivery of your monthly statements and T5 slips.
When you sign up for digital delivery, you will have the option to receive an email notification letting you know your statement and/or T5 slip is ready to view.
Anyone who earns interest totaling $50 or more on non-registered funds per membership will receive a T5 slip.
To switch your Worldsource mutual fund statements, log in to Worldsource View and follow the prompts.
Direct Deposits & Pre-Authorized Payments
Tutorials
When setting up a pre-authorized debit (like a bill payment) or credit (like payroll), you may be asked to provide a void cheque. You can view and download a void cheque using Coast Capital’s digital banking.
-
Log in to digital banking through a computer or our mobile app
-
From the menu, tap Account Overview, then Download Void Cheque
-
Select the account you want the Void Cheque for and confirm your address is correct
-
Click the Export button to download a PDF file containing your void cheque
-
You can save or print this PDF to provide a digital or physical copy
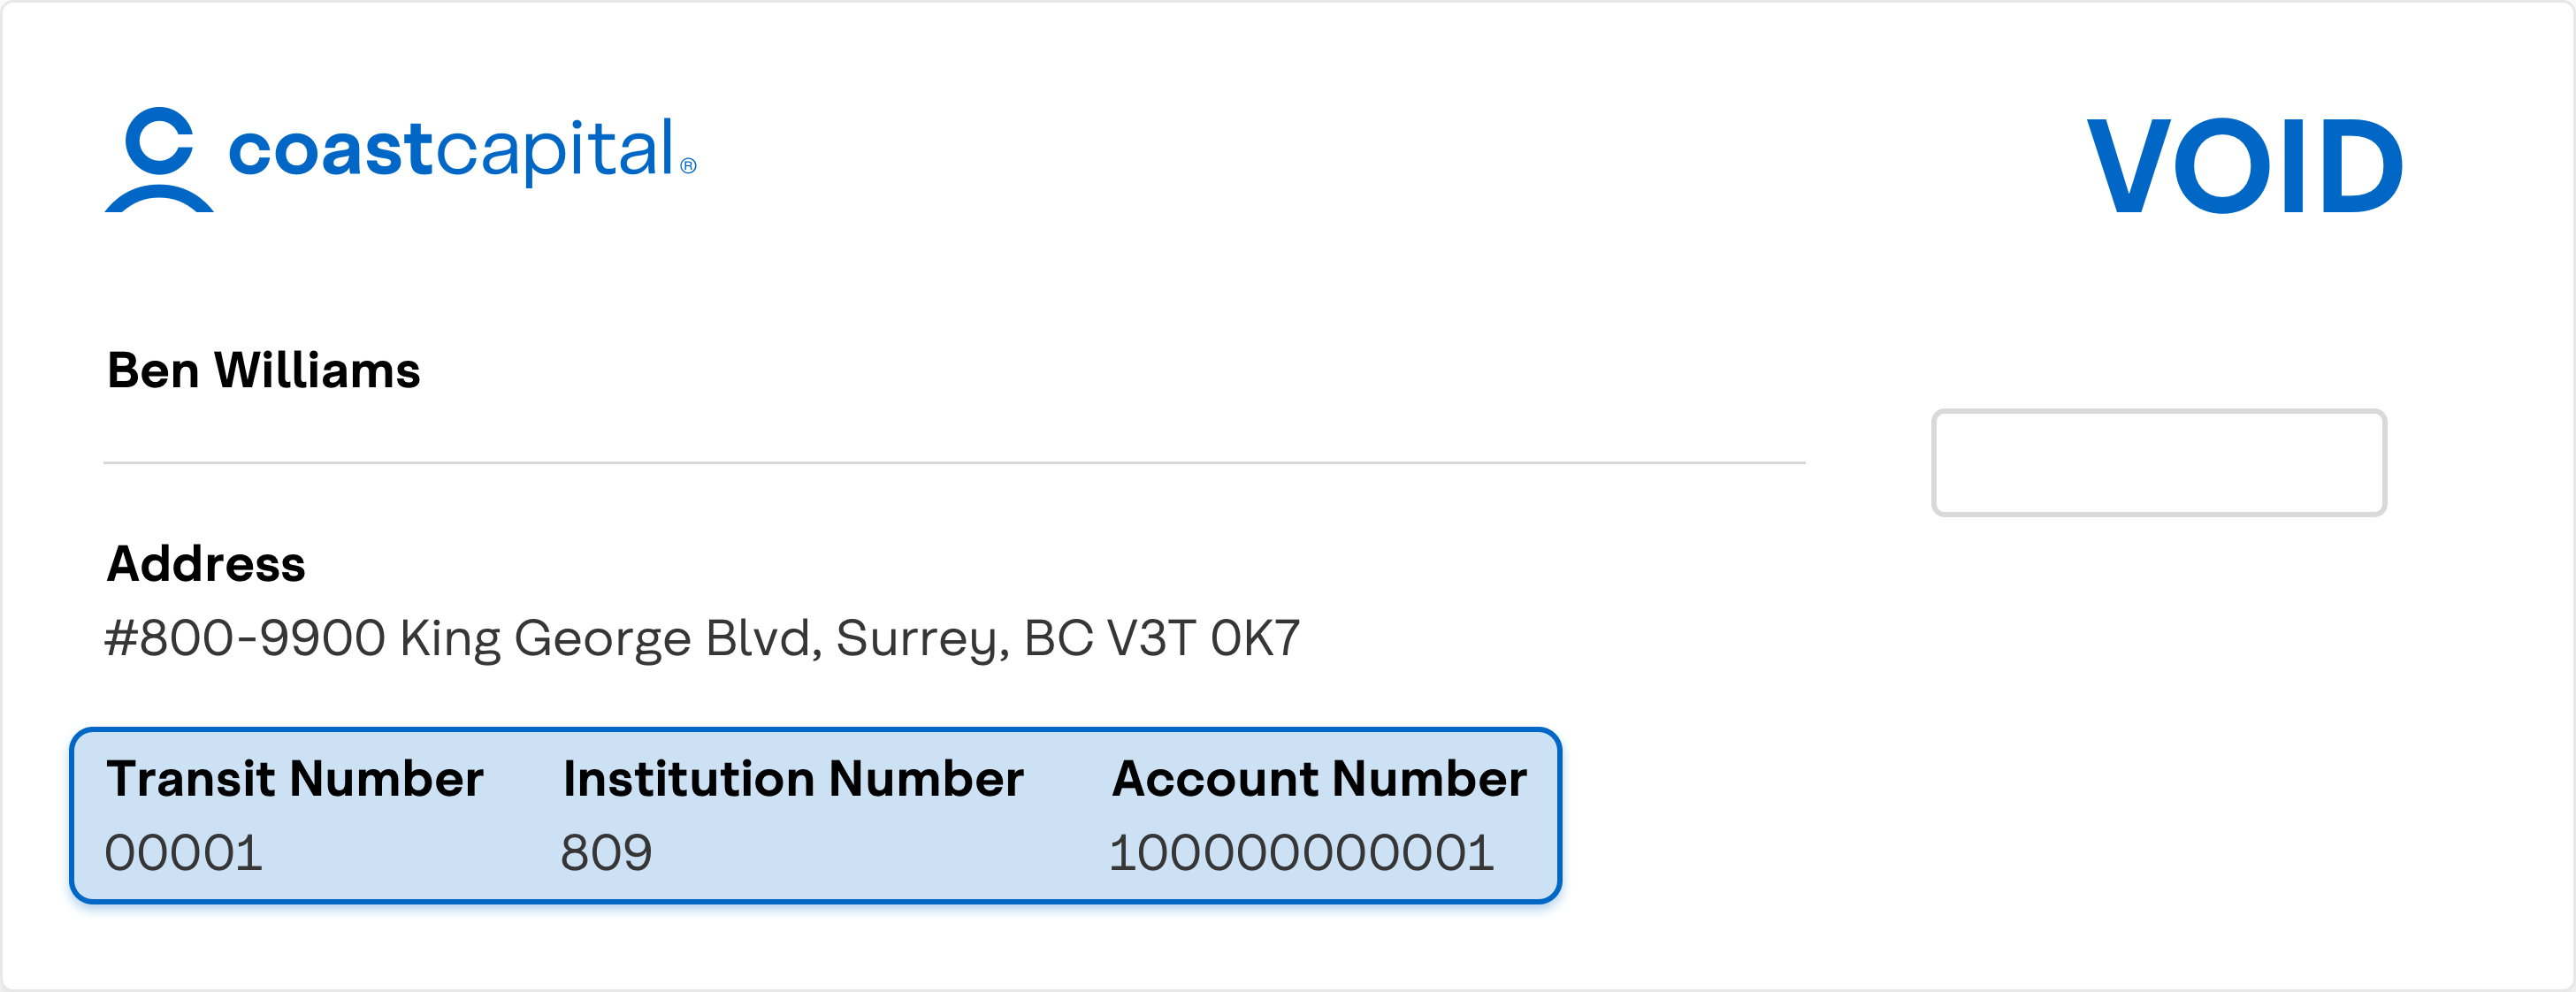
Just need to provide your account information? Here’s where you can find your transit, institution and account numbers on your void cheque:
CRA Direct Deposit is a secure and convenient way to receive your CRA benefits. You can set up CRA direct deposit right from within digital banking. Learn how
Pre-authorized payments (also known as pre-authorized debits) are payments that are set up to debit your Coast Capital account and credit a vendor (like a bill payee or gym membership).
Pre-authorized payments are set up directly with the bill vendor, and you can often do this through your online account with them.
What you’ll need:
- Your Coast Capital account information (You can get this easily by downloading a digital void cheque - see the tutorial above).
- Your login details for the bill vendor
How to do it
Here are the step-by-step instructions for some of the most popular bill payees (as of July 2024):
BC Hydro
- Log into your MyHydro account
- Select “Billing & Payments” from the menu
- Select “Ways to pay your bill”
- Select the “Pre-authorized payments” option, then select “Set up auto-pay”
- Fill in your Coast Capital account details and follow the rest of the steps
Fortis BC
- Log into your Fortis BC account
- From the Accounts Summary page, select “Set up Pre-authorized Payment Plan”
- Fill in your Coast Capital account details and follow the rest of the steps
Telus
- Log into your My TELUS account
- From your Overview, select “View and Pay Bill”
- Select “Statements”
- Select the “Recurring Payments” icon for the target account
- Under Payment Account, select “Credit card or bank account”
- Fill in your Coast Capital account details and follow the rest of the steps
Collabria
- Log into your Collabria account
- Select “Make a Payment”
- Select “Manage Payment Accounts”, then select “Add Account”
- Fill in your Coast Capital account details and select “Add Account”.
- Select “Autopay”
- Choose the payment option. Click Schedule.
- Select OK to activate Autopay
Tip: Autopay will take effect on the next statement cycle, so remember to still make your current payment manually.
Common Questions
A direct deposit is a secure electronic transfer of funds deposited directly into your bank account. Direct deposit replaces the need to issue payments by paper cheque.
-
Payroll (if direct deposit is supported by your employer)
-
Income tax refund
-
If eligible, government payments like the Canada Child Benefit (CCB), GST/HST credit, Canada Workers Benefit (CCB) and the Canada Emergency Response Benefit (CERB).
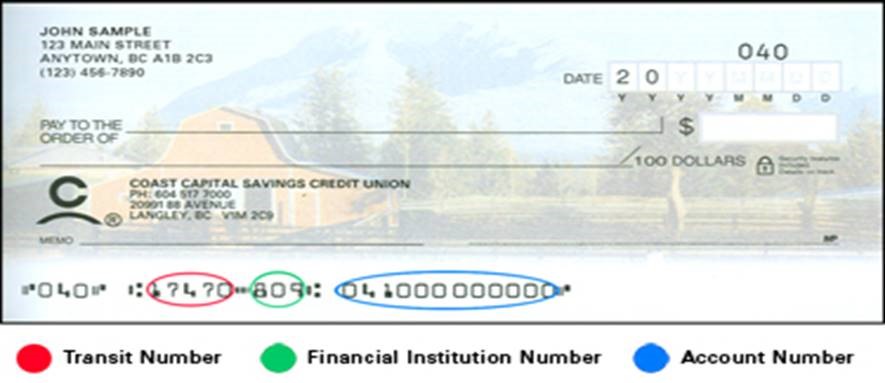
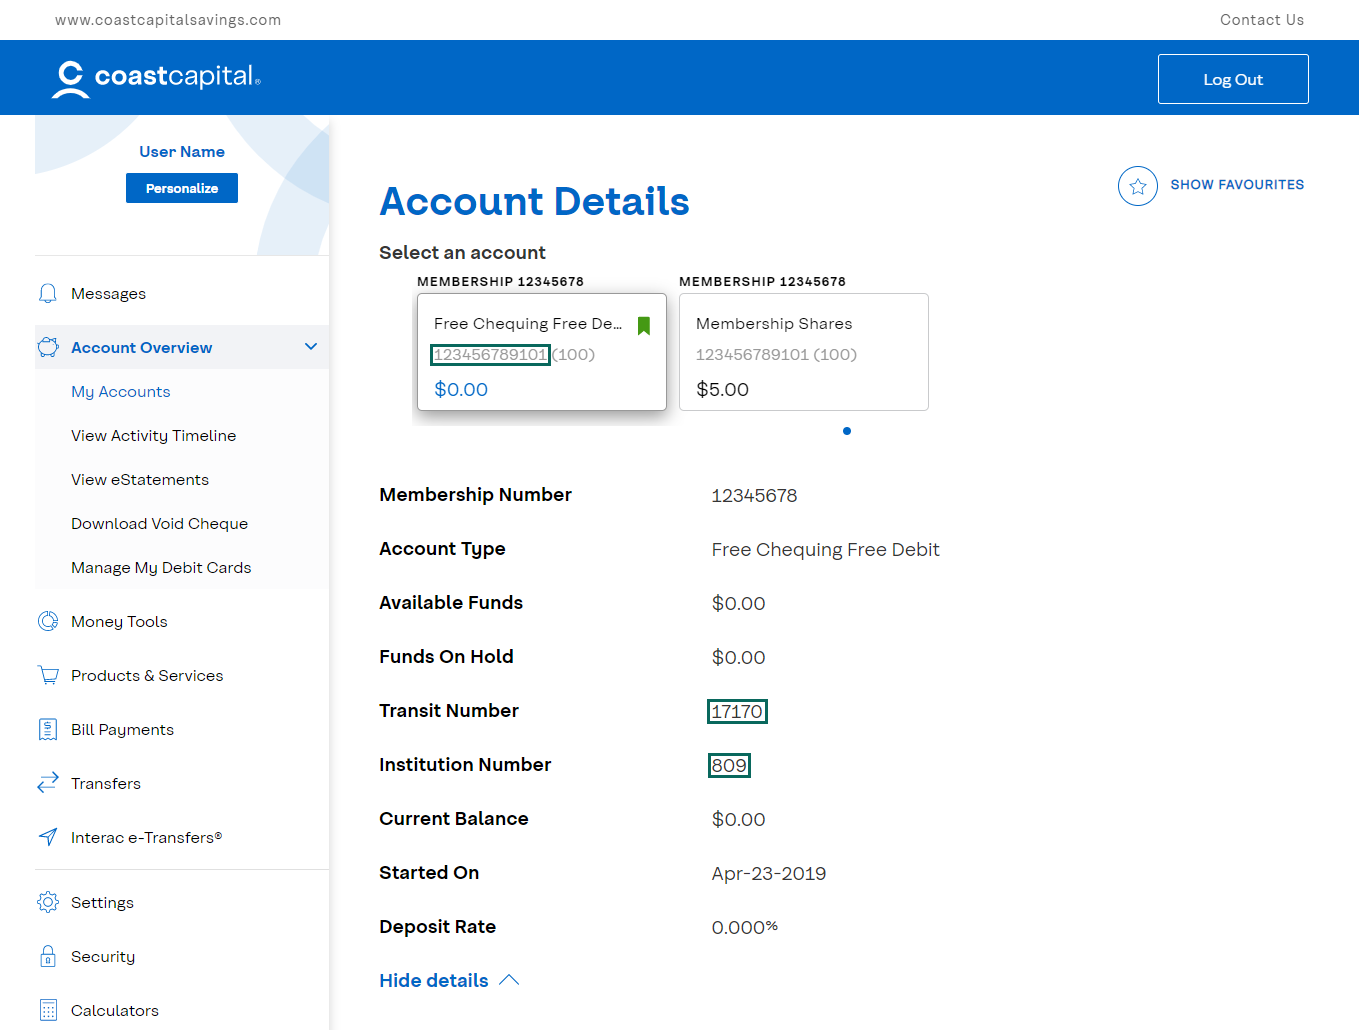
You can find this information in a few places:
- On your personalized cheque
- In digital banking by following these steps:
- Log into digital banking
- From the 'Accounts Overview' screen, click the account you wan this information for
- Click Show more details
- You can also use our void cheque feature. For detailed instructions, check out the "Download void cheque" tutorial above.
Manage Debit Cards
Tutorials
In the event your debit card is damaged or lost, you can order a replacement through digital banking.
- Log in to digital banking from a computer or our mobile app
- From the menu, click Account Overview then Manage my debit cards
- Find the card you wish to replace, and click on the Damaged or Lost icon
- Confirm you wish to replace your card
Your old card will be cancelled immediately and your new card will be sent to the address we have on file within 5 to 7 business days.
If you misplace your debit card, you can lock it to prevent unauthorized use, and unlock it once you find it.
- Log in to digital banking from a computer or our mobile app
- From the menu, click Account Overview then Manage my debit cards
- Find the card you wish to lock, and click on the Lock icon
- Confirm you wish to lock your card
Your card will remain locked until you unlock it. Your access to digital banking will not be affected.
If you have already locked your debit card and have located it, you can unlock it to reinstate point-of-sale purchase and ATM access. You will need to be able to receive a one-time security code to unlock your card.
-
Log in to digital banking from a computer or our mobile
-
From the menu, click Account Overview then Manage my debit cards
-
Find the card you wish to unlock, and click on the unlock icon
-
Enter the one-time security code we send to your mobile phone or email and click Confirm
-
Confirm you wish to unlock your card
Your card will remain in Action Required status until you use it at an ATM or to make a point-of-sale purchase.
Watch this video for a full run-down on how to lock and unlock your cards.
Common Questions
No, locking your debit card will only block physical point-of-sale purchases and ATM access. Digital banking access is unaffected.
Yes, if you have your debit card linked up with Apple Pay and lock your debit card online you will not be able to use Apple Pay. Once you find and unlock your debit card, you need to perform a point-of-sale purchase using your chip (not tap) or ATM transaction to re-enable Apple Pay.
If you’re on a computer or mobile web, underneath the image of your card, click “Show accounts”. You will see what membership the card is for.
If you’re on the app, click on the debit card image to show which membership the card applies to.
Your card will remain in Action Required status until you use it at an ATM or for a point-of-sale purchase.
We use security codes to double check it’s really you making a change or transaction. This is a feature in place for your security.
If your card status is Unavailable, please visit a branch or give us a call at 1.888.517.7000.
Alerts & Notifications
Tutorials
Transactional alerts help you keep track of your account activity, including your balance, deposits and credit. Here’s how to turn them on.
- Sign in to digital banking
- From the menu, select Settings, then Alerts & Notifications
- Select Transactional Alerts
- Select the account you wish to receive the alert for
- Select the alert type, and use the toggles to specify how you’d like to receive the alert
- Select Save
Security alerts alert you of security-related activity on your accounts, like login activity, password changes and more. Several of these alerts are automatically turned on for your security.
To learn more about what alerts are turned on, and to turn on login alerts:
- Sign in to digital banking
- From the menu, select Settings, then Alerts & Notifications
- Select Security Alerts
You’ll see the different types of alerts that are turned on. To turn on login alerts:
- Select Login
- Use the toggles to specify how you’d like to receive the alert
- Select Save
Bill payee alerts alert you when a new bill payee is added to your membership. Here’s how to turn it on.
- Sign in to digital banking
- From the menu, select Settings, then Alerts & Notifications
- Select Bill Payee Alerts
- Use the toggles to specify how you’d like to receive the alert
- Select Save
Money Manager alerts help you keep track of your budgets within Money Manager, Coast Capital’s personal financial management tool. Here’s how to turn them on.
- Sign in to digital banking
- From the menu, select Settings, then Alerts & Notifications
- Select Money Manager Alerts
- Select the alert type, and use the toggles to specify how you’d like to receive the alert
- Select Save
Don’t use Money Manager yet?
Money Manager is Coast Capital’s free, personal financial management tool that gives you the control to make smart, informed decisions with your money. Learn about your spending habits, set budgets, track your progress towards your goals and pay down your debt more effectively. Learn more
Common Questions
Transactional Alerts
These alerts keep you updated on your balance and transaction activity. They include:
Balance
- Daily Balance
- Weekly Balance
- Monthly Balance
- Low Balance
Deposits
- Withdrawal
- Deposits
Credit
- Remaining Credit
Many of these are customizable. For example, you can specify that you’d like to receive a low balance alert when your balance drops below $500, or that you’d like to receive a withdrawal alert when a withdrawal over $1000 is made.
Security Alerts
For security purposes, these alerts are automatically turned on for all members:
- Password changes
- User locked (if your membership is locked out)
- New biometric access set
- Password attempt lock (if your membership is locked out due to too many incorrect password attempts)
You can also choose to turn on login alerts to be notified whenever your membership is logged into.
Bill Payee Alerts
This alert will notify you when a new bill payee is added to your membership.
Money Manager Alerts
These alerts help you keep your spending in check by alerting you when you’re nearing or have exceeded your Money Manager budgets:
- Budget projected to be exceeded
- Budget exceeded
Don’t use Money Manager yet?
Money Manager is Coast Capital’s free, personal financial management tool that gives you the control to make smart, informed decisions with your money. Learn about your spending habits, set budgets, track your progress towards your goals and pay down your debt more effectively. Learn more
Security
Common Questions
As part of our enhanced security measures, we’ll occasionally request a security code from you when you are completing certain transactions to confirm it’s really you. A security code is a 7 or 8 digit security code that we’ll send you through a text message to your mobile phone or through email when you do the following:
- Add a new bill vendor
- Update contact information
- Add an e-Transfer recipient
- Change your password
- Unlock your locked debit card
- Log into digital banking after a period of inactivity
Your digital security is our priority. Here's how our digital banking helps you keep your information secure.
Security Codes
We’ll send a security code via text message to your mobile phone or through an email when you complete specific tasks to verify it’s really you performing the transaction.
Security Alerts
We’ll send you a security alert via email and text message when your password changes, if your membership is locked out, when new biometric access is set and if your membership is locked out due to too many incorrect password attempts. You also have the option to turn on login alerts to be notified when your membership is logged into.
Device Management
If you lose your phone or tablet, you can protect yourself and your information by disabling mobile access from a desktop computer.
Proactive Fraud Detection
We've enabled sophisticated fraud detection technology that assesses real-time risk using indicators related to your information and devices.
Personalization
Tutorials
Quickview allows you to check your account balances through our app without having to log in.
-
Log in to digital banking through our mobile app
-
From the menu, tap Personalize my app, then Quick Access Shortcuts
-
Tap the button next to Account Quickview and tap Add Quickview Account
-
Select the options that suit your preferences, then click Add Quickview account
-
You can now view your account balances through the app without logging in by opening the app and swiping right.
Learn more about the different ways you can personalize your digital banking experience:
Save time by creating a list of your frequent transactions with Favourites. This feature is available for Transfers and e-Transfers.
-
Log in to digital banking
-
Complete the transaction that you would like to set as a favorite. Once the transaction is completed, select Add to Favorites
-
Create a name for the transaction and select Add to Favourites
Once you’ve set a transaction as a favourite, you’ll see it saved on your My Accounts dashboard when you log in. Select the Favourite transaction to initiate it.
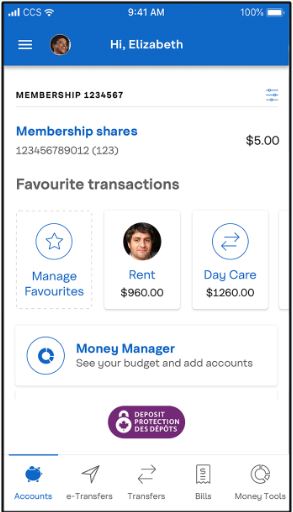
You can also find your Favourites by selecting “Personalize” from the menu, then “Favorite Transactions”.
Make digital banking your own by adding a profile picture to your account.
-
Log in to digital banking
-
From the menu, tap Personalize, then tap Customize Profile Images
-
Set your profile photo:
On our app, you can tap Camera to take a new photo, Upload to use an image from your camera roll or Reset to change the profile picture back to the default image.
On a computer, tap the camera icon to upload an image from your computer
If you would like to dedicate an account for a specific purpose like home payments, vacation savings and so on, you can give it a custom name.
-
Log in to digital banking
-
From the menu, tap Personalize, then tap Customize Accounts
-
Click the pencil icon next to the account you want to rename
-
Enter a new name for the account and click the green check icon.
-
Log in to digital banking
-
From the menu, tap Security then Change username
-
Follow the prompts on screen
-
When finished, you will be logged out of digital banking. To continue banking, just sign in again.
Please note, when you reset your username, your previous username will not be able to be used again.
Common Questions
No, you can quickly view your account balances without logging in by setting up Quickview on our mobile app. Check out the tutorial above to learn how to do it.
Technical Help
Tutorials
To help solve challenges you may experience with digital banking, we may ask you to clear your cache and cookies. Here’s how to do it on a few popular browsers: Chrome, Safari and Firefox. If you use a different browser, a quick Google search should help you.
Chrome (Windows and Mac)
Clearing cache and cookies
- Open Chrome on your computer
- If you’re using Windows, click the More button “
 ” at the top right of the browser, then “More tools”
- On a Mac, click “Chrome” from the menu bar at the top of your browser
- Click “Clear Browsing Data”
- Select “All time”
- Check the boxes next to “Cookies and other site data” and “Cached images and files”
- Click “Clear Data”
Safari (Mac)
Clearing cache
- Open Safari on your computer
- Use shortcut Command+Shift+E OR
- Click “Safari” in the browser menu bar, then “Preferences”
- Click “Advanced” and check the box next to “Show Develop menu in menu bar”
- Click “Develop” from menu bar, then “Empty cache”
Clearing cookies
- Click “Safari” in the browser menu bar
- Click “Preferences” then “Privacy”
- Click “Manage Website Data”
- Click “Remove All”
Firefox
Clearing cache and cookies
- Open Firefox on your computer
- Click the Menu button “
 ” on the right of your browser bar
 - Click “Preferences”
- Click “Privacy and Security”
- Click “Clear Data”
- Check the boxes next to “Cookies and Site Data” and “Cached Web Content”
- Click “Clear”
To help solve challenges you may experience with digital banking, we may ask you to access digital banking using a private browser (also known as Incognito). Here’s how to do it on a few popular browsers: Chrome, Safari and Firefox. If you use a different browser, a quick Google search should help you.
Chrome (Windows and Mac)
- Open Chrome on your computer
- Click the More button “
 ” at the top right of the browser (Windows) or “File” from the menu bar at the top of your browser (Mac)
 - Click “New Incognito Window”
- A new window will open for you to use
Safari (Mac)
- Open Safari on your computer
- Click “File”
- Click “New Private Window”
- A new window will open for you to use
Firefox
- Open Firefox on your computer
- Click the Menu button “
 ” on the right of your browser bar
 - Click “New Private Window”
- A new window will open for you to use
Common Questions
Accessing Digital Banking on a computer
Supported Desktop Browsers
To provide you with a secure and protected online banking environment, we recommend using the supported browsers listed below. We do not support beta or test versions of browsers.
-
Apple Safari (latest version)
-
Google Chrome (latest version)
-
Mozilla Firefox (latest version)
-
Microsoft Edge (latest version)
- Note: Our personal financial management tool, Money Manager, does not support IE11.
Supported Mobile browsers
-
Apple Safari on iOS 13 or higher
-
Google Chrome on Android 5 or later
To access online banking through your mobile browser, simple visit https://banking.coastcapitalsavings.com.
Transport Layer Security (TLS) Encryption
TLS stands for Transport Layer Security (TLS). This technology allows users to establish sessions with Internet sites that are secure, meaning they have minimal risk of external violation. Once inside the Coast Online Banking site, you are secure through our use of SSL technology. Encryption is the process of scrambling information into a more secure format for transmission. This means that plain text is converted (encrypted) to a scrambled code while transmitting, and then changed back (decrypted) to plain text at the receiving end of the transmission.
Cookies
Coast Online Banking uses two kinds of cookies - session cookies and persistent cookies. We use a session cookie to maintain the integrity of your Internet banking session, and we use persistent cookies in optional enhanced features such as the saved Member Cards and saved member transfers features. For more information on our use of cookies, please review the cookies section in our Privacy Policy.
To use digital banking, you must ensure that you have not disabled your browsers’ ability to accept cookies (particularly first-party session cookies). For more information on enabling, and disabling cookies within your browser, please review your browsers’ help section.
JavaScript
To view interactive elements of our site and log in to Coast Online Banking, you must enable your computer's web browser to accept JavaScript. For more information on enabling Javascript within your browser, please review your browsers’ help section.
Coast Capital Mobile App
To use our app efficiently, your phone needs to meet the following requirements depending on your device type:
- iOS 13 or higher
- Android 5 or higher
Downloading the App
From your device, open the App Store (Apple) or Google Play (Android) and search “Coast Capital”.
- Approximate & precise location – allows the app to use the device’s GPS to find the nearest branch or ATM
- Network access – allows the app to connect to the internet
- Access to the camera – allows you to make a deposit by using the app to take a photo of a cheque
- Contacts and calendar – allows you to create new INTERAC® e-Transfer recipients by selecting from your device contacts
The Coast Capital Savings mobile app isn’t optimized for tablet use. If you enjoy doing your banking through your tablet, we recommend creating a link to banking.coastcapitalsavings.com on your tablet’s home screen for quick and easy access. Perform a search engine search for instructions on how to do it on your tablet.
Worldsource Balance Display
Tutorials
To display your Worldsource Financial Management investment balances, follow these steps:
- Log in to digital banking
- From the menu, tap Partner Accounts, then Display Preferences
- Under Worldsource, tap Display
- Review the conditions and tap Display Worldsource accounts
Your Worldsource Financial Management balances will now be displayed on your My Accounts dashboard.
To hide your displayed Worldsource Financial Management investment balances, follow these steps:
- Log in to digital banking
- From the menu, tap Partner Accounts, then Display Preferences
- Under Worldsource, tap Hide
Your Worldsource Financial Management balances will no longer be displayed on your My Accounts dashboard. You can change this back at any time.
Common Questions
To add your Worldsource Financial Management accounts to Money Manager, follow the steps for linking external accounts to Money Manager:
- Log in to digital banking
- From the menu, tap Money Tools then Money Manager
- Tap Add Accounts and follow the prompts
You can recover your login credentials through Worldsource View. If you need support, please contact Worldsource Financial Management directly.
Other Digital Tools
Tutorials
Apple Pay allows you to easily pay with your Coast Capital debit or credit card using your iPhone, iPad or Apple Watch.
You can open a membership online in just five minutes with our simple online membership opening process.
Don’t see your question listed here? Explore our Help & Support section for more resources. If you’re a Business member, check out our Business Digital Banking Resources & FAQs.

